BOM: Journey of a Quilter (JOQ) (entry 1)
Dec-2009
Here’s the first block in our new Block of the Month Series called Journey of a Quilter. This block of the month is so beautiful and pretty it would look great on your walls in your studio or office or where ever your little heart desires.

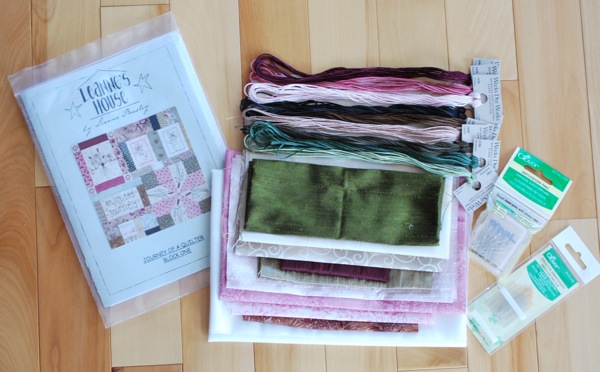
I’ve incorporated gorgeous dupioni silks (from India), cotton quilting fabrics from all sorts of designers, hand dyed embroidery floss (Weeks Dye Works), embroidery needles (Clover), sewing machine needles (Schmetz), silk pins (Clover, as these are my absolute favourite)
Since I fell in love with this Block of the Month, I’ve discovered most retail and online stores only do this as a pattern and not a monthly kit inclusive of pattern and fabrics. I’m offering both options.
Option 1 – Pattern Only
Option 2 – Full Kit
Here’s what you will receive with Block ONE’s kit.
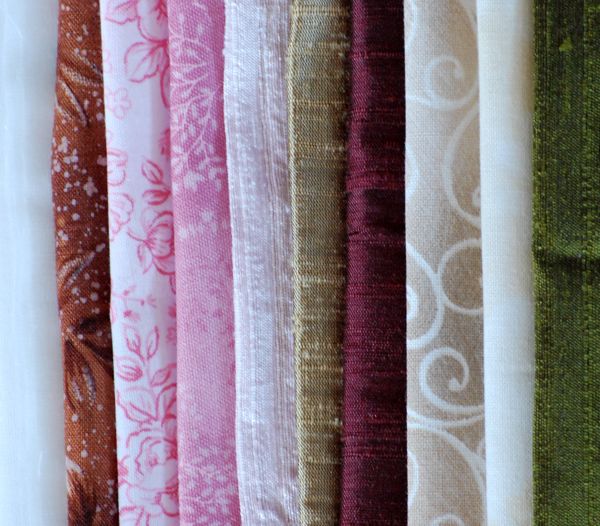
Here’s a close-up of the fabrics for block one
l-r: fuse, dark brown, med pink, med pink, light pink silk,
wheat silk, dark pink silk, beige, beige and green silk.
I was so excited cutting out the fabrics that I couldn’t wait to put mine together to show you.
XXXXXXXXXX
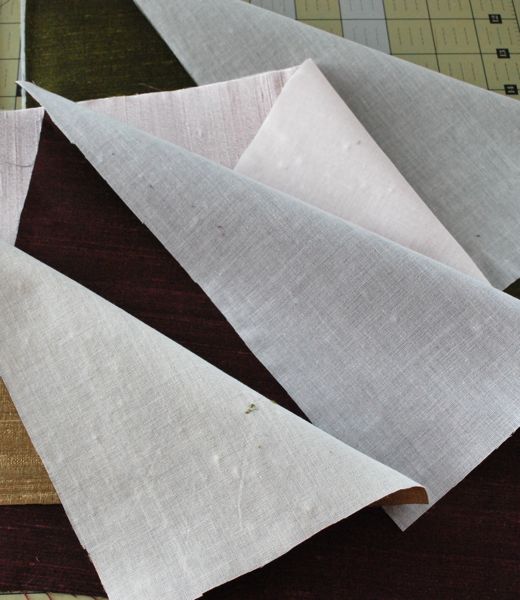
First thing to do is prepare the silks to work with by fusing the interfacing to the back of each piece.
Each block consists of a collection of Mini Blocks (mb) in the first one there are 5.
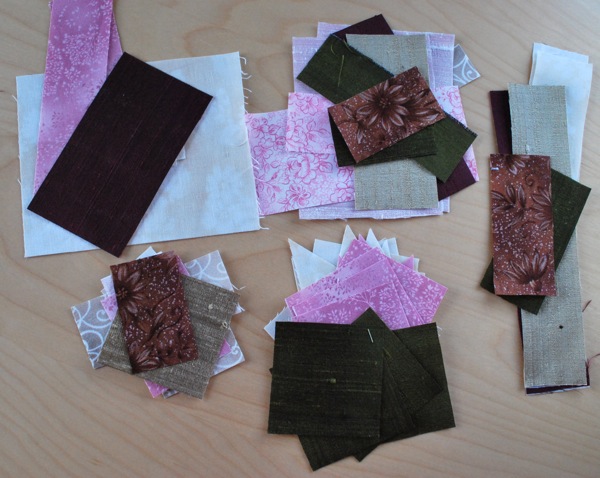
Once I cut out all of my fabrics I put them in piles according to the mini block they belong to
mb1 mb2 mb3
mb4 mb5
Then I ensure I have all of the proper pieces and start sewing each of the mini blocks together.
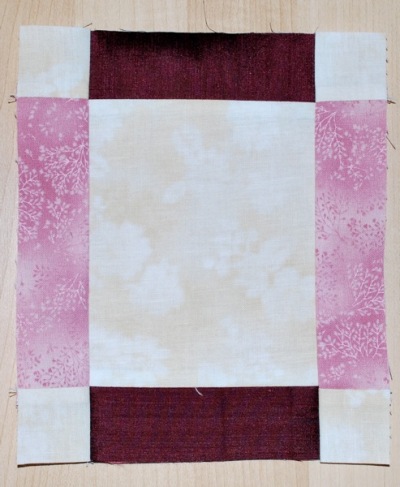
mb1, 7 1/4″ tall x 6 1/4″ wide

mb2, 7 1/4″ tall x 9 1/4″ wide
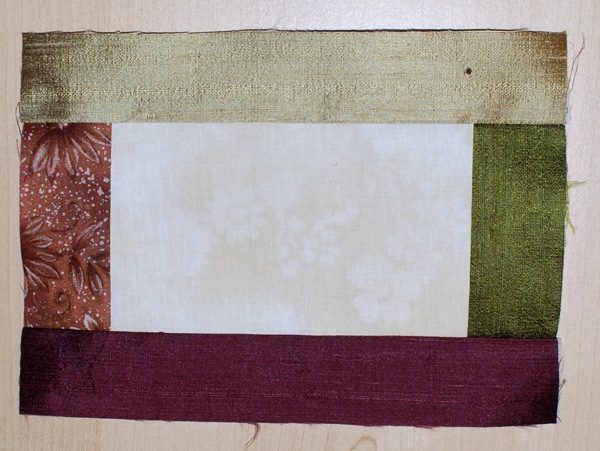
mb3, 5 1/4″ tall x 7 1/2″ wide

mb4, 3 1/2″ tall x 7 1/4″ wide
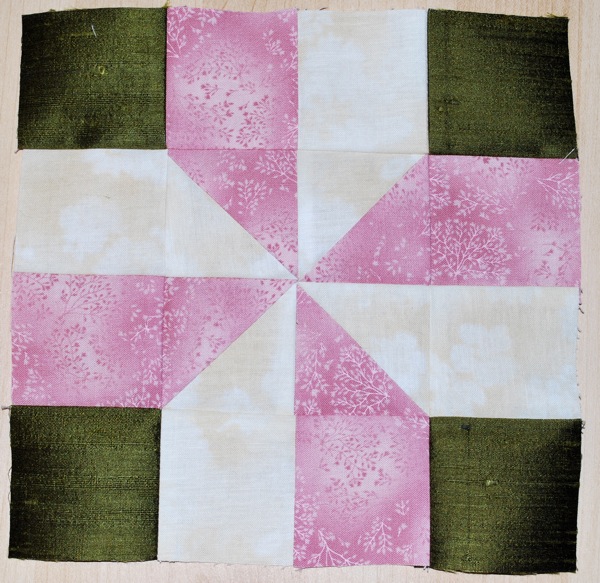
mb5, 8 1/4″ tall x 8 1/4″ wide
For mb5 with the half square triangles, I’ve allocated a full 3″ for the pink and the beige then after I connected them together I trimmed them up to 2 1/2″. If you are unsure about how to construct a half square triangle, please visit this tutorial for instructions.
***for all measurements that I’ve added to the mb’s above please note that I’ve measured these after I completed the block, please let me know if I’ve listed any of the unfinished sizes incorrectly and I’ll adjust – thanks so much!***
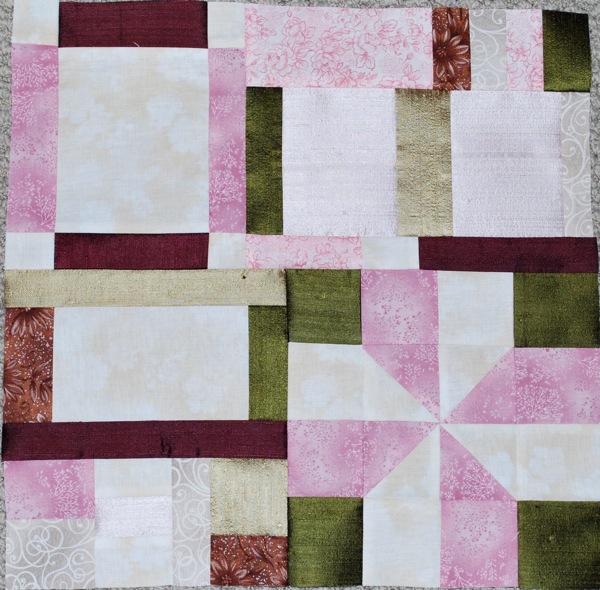
Final block one all 5mbs sewn together, don’t you just love the combination of silks & cottons?
Unfinished size of this block 15 1/2″ x 15 1/2″
I traced my stitchery pattern to the block and now I’m going to sit, watch a movie and get the stitching completed. You don’t need a light box but boy does it make the lines and shapes clearer when it comes to tracing so if you can afford one, I would recommend it 🙂

I look forward to going through this journey with all of you, please contact me with any questions.
January 31st, one more person has joined just this morning 🙂 So we have a total of 24 Full Kit Members and 3 Pattern only gals – welcome to all of you 🙂 Most of our members are from Canada with 1 sole member from the USA!!
I’m in the process of working on some short videos to show you some of the different stitches we’ve used so stay tuned!
Embroidery on the block is finished…it’s so beautiful…if you were hesitating before come join the fun

Hi Ladies, so to date I’ve received two completed block images. Have two names to draw would be pretty good odds for these two gals and a great prize!!
Amie’s

And Kathy’s

How’s everyone else doing on their blocks, anyone need any help?
Kim’s finished block, nice job with the buttons Kim…

so we have three names going into the draw…anyone one else before I mail out block two Monday morning???
Okay, 9:21 my time and I just received another completed block, I will wait until Midnight before I draw the name…2.5 hours remaining for the very first prize winner.
Here’s Susanne W’s block, isn’t it interesting how each block turns out a little bit different?

4 people in the draw now 🙂 good luck everyone!!
WINNER of Prize for Block One completion YAY!! congrats to Susanne W you’ve won a large thread cone and a 20gram tin of Quilters Tea…congrats Susanne, in just under the wire 🙂

Here’s Isobel’s block one: even though she just finished it it’s so nice of her to share her progress with all of us…thanks Isobel and I’m so glad you are keeping up!!

Hi Ladies, here’s another block 1 from Rita, she’s catching right up!!

Here’s Elke’s block 1

Here’s Vivians Block 1

This looks like a fabulous BOM!!! Oh, how tempting!!!
Hi Val,
Just ordered this! Thank you for your encouraging email. It is this tutorial post that finally sold me…. I love being able to "see" the steps… definitely gave me more confidence that I can do this.
thank you!!
SheilaC
Very impressive, I was wondering how large it was overall initially and I now see that this is way beyond my skill set but I will enjoy watching along with all of you who create this beautiful quilt. Thank you for sharing. This detail is awesome.
As I said I am not very good at all of this but I really did want to try it all out! Feedback wise…I would have liked a pintout, or something, of the embrodery stitches that we are doing. Sewing I can wing it but when it comes to actual stitching I am at a loss of knowledge! Anyway, I am just going to look them up online and get them but I just thought for feedback that that might be an idea for ya!
Hi Amie, okay, I’ll see what I can do about the stitches…I’ll work on something for you all maybe short videos or closeup pics – not a problem I’m on it 🙂
Valerie
Hey, Val..I was looking up the stitching online and I found a really good website for the stitches. I don’t know how these things work in Blog land but this website has all the stitches you would ever need. Just thought I’d pass it along. PS~it’s going really well!
http://www.fidella.com/webstitch/needle_stitch.html
Hi Amie, sounds great!!! Thanks so much for sharing this website with everyone including me. Today, I did a video showing back-stitch and a french knot it will be up shortly for viewing pleasure. I’m so glad you are doing well and feel good about it since you are so new to quilting…yay!!
Valerie
PS, how are the rest of you ladies doing? Please leave us some comments and feedback as we need to stay connected during our journey.
Hey Val,
I have finished my first block in the Journey of a Quilter and I have to say it has been the forst BOM I have truly enjoyed doing and I cannot wait for the next block. Your video’s and instructions are great especially if you are a new quilter. It makes the project less intimidating. So I would encourage anyone who is hesitating to GO FOR IT. You will be happy you did. What do I do next to show you the finished block.
Kathy B.
Hi Kathy, thanks so much for your comment I feel fab receiving a comment like this from a Block of the Month Queen 🙂 Just bundled up the 2nd block to this great journey…They will be going out in the mail Feb 1st!!
Valerie
Oh great job you two!!! And you each did the stitchery just a little bit different so they are unique. I’m the late joiner so I hope I will be caught up by the end of month 2! can’t wait!
I love the 2 blocks that have been posted so far! Both the same pattern, yet each unique! Those real buttons are a great idea!
Working on mine…. pics next week! 🙂
SheilaC
Hi Ladies, one week left today to get your blocks in for a great prize…Good luck!!
Valerie
Hey Val,
Got my block pieced, and I would say, half of the embroidery done so far. Heading to Ontario on Thurs. for the weekend, and hoping to finish it on the plane, or the weekend there, but probably won’t get a picture off in time 🙂 Not sure how to smuggle the scissors into my carry on??
So I’l post when I’m back, and catch the next contest. I too struggled a bit with the embroidery stitches as I am new to this part of it, but I think that I do have a book here somewhere in my sewing room!
Know that I finally figured out how to get on here, I’ll try to comment a bit more often.
Your doing a great job! Love ya,
Shan
Shan, you can take nail clippers on the flight and use them to cut the threads. Or child’s safety scissors (blunt tip) would probably be ok, too.
Isobel 🙂
ok, I got my block all pieced and my embroidery lines all traced… couple of things came up and I’d like feed back from everyone.
I had some issues with the interfacing on the silk. I like to press my seams and then open the block and press. But the interfacing was very heat sensitive and I had to be super careful… was I doing anything wrong?
What did everyone use to trace their embroidery lines. I hate the pen I bought…. it is washable so I thought that would be good, but had the hardest time drawing on the fabrics. Any better ideas out there?
About backing for the stitchery blocks,,, Val do you put a layer of Hobbes batting on the whole block? Then when you sandwich the quilt will you put in an additional layer of batting? I was thinking of picking up some fusible interfacing tomorrow to stabilize mine… and then stitch, stitch, stitch! 🙂
Val, I just have to say that your tutorial here on the blog has been invaluable to me. I am not sure I could have gotten through this as painlessly as I did without you! Your directions and cutting directions were a huge help. Thank you so much for your support!
Sheila
PS put a pic on my blog with the tracing lines…..
Hey Sheila, hmmm so you press your seams after you sew to "set" the seam – that’s good, the interfacing shouldn’t get in the way of that? Are you using steam in your iron? I use a hot dry iron with this interfacing (any adhesive stabilizer). The rough side of the interfacing against your silks right? You sound like you’re doing all of the right stuff.
I just discussed the pen with Isobel, she was having a hard time too, girls; buy a Micron/Pigma pen from Walmart or Michaels – even Martha Stewart has a line. get the one that is a neutral brown and there is two sizes I would recommend the 05 and the 005 for tip size. These are a permanent marking pen – FAB to work with.
For the Hobbs Batting, yes I put it on the entire back of the quilt because it provides a good stability to hold onto and stitch through plus it helps hide the threads from showing through to the front. Once we are done with all of the 9 blocks we will cut the batting back 1/4" all the way around the inside of the block, sew all 9 blocks together. We will NOT be adding another layer of batting. Sheila, be careful with the fusible interfacing as it may be hard to needle through with the glue, get something super light weight. You could also use a muslin for stability if you wanted.
This is just a suggestion to use the batting, it’s something I’ve started doing for myself and I like the results you can however use a method that you like, this is just a suggestion 🙂
Thanks for the feedback on the step by step tutorial, I really love this pattern but found Leanne’s instructions not very good for step by step and for newbie’s so I hope I’ve helped you girls out in that regard 🙂
good luck ladies, we’re all here to help and give advice, for those of you who haven’t commented yet, please do so as we would love to have more chit chat here *smile*
Valerie, have a great weekend girls, Ill be drawing the winner of block one on Sunday!
Thanks for the tips, Val… I do have the micron pen. I was afraid to use a permanent pen though!
And I may try the batting…. I love the Hobbes batting too. And that would probably work better since I want to add some embellishments too!
SheilaC
Hi Everyone! I have finished piecing my block (I received my kit on thursday, that’s me, the late starter LOL) and will be stitching this weekend. I traced using a pencil, I’ll see how that works. I’m also going to use my All Natural cotton batting to stitch through. I’ve never heard of this other you are using but it’s what I have and even more so, I know it’s what the quilt shop in town sells. It’s thin so it should work.
I posted my progress on my blog. I’m not sure how you put pictures here but you can peek at my blog: http://nn.dlpgraphics.ca/blog
I’m looking forward to getting to the stitchery!
Vivian
Yukon Territory
I haven’t finished the embroidery. Got bogged down with a rag quilt for DD’s friend and never got back to embroidering. I will try to get it done in the next few days, though. Still struggling with an appropriate fabric pen but feeling a bit more comfortable with the one I have. And hoping that my mum was able to find a pen at Michael’s and mail it to me before she heads off on holiday.
I’ve made great headway. I posted a picture of part of my stitchery on my blog. I didn’t get it all finished, I’m nearly done MB 1 and then I need to do MB 2 and 5. I did the easy parts first LOL.
So Val, what do you think about posting a list of all of us ladies here? This way we could visit each other’s blogs (if we all have them?)
I know I post updates of my progress on my blog, and I would love to follow along with the ladies….
What does everyone think? I understand if people would prefer to be "private"….. maybe we could email you our preferences, and no hard feelings either way?
just thinking……. 🙂
SheilaC
Sheila, I would love to have everyone get to know each other better – that would be so FAB but as far as I know you were the only one that shared their blog with me…
Everyone visit Sheila’s blog and leave her a comment on her progress if you wouldn’t mind 🙂 http://myemptynestisfullofcathair-sheilac.blogspot.com/
Well, I finished BOM1 a day late, but none the less. Lovin’ it.
Received the BOM2 today, and have it all cut ready to piece, I am so keen to see what it is going to look like;)
It’s going to feel like Christmas in the mail each month.
Thank you Val for your tutorials, updates, and instructions, very helpful (to us all it sounds like!)
Love ya, keep up the good work my friend, (and for the record I don’t have a blog spot).
Shan
Hi Val:
The package arrived in the mail early this week and my plan is to get working on the block early. I finished sewing the first block before the end of February but I am still working on the stitching.
I have not worked with fusible interfacing before so just in case I had it up side down (which I did on the first piece that I worked with), I used a piece of parchment paper – folded in half and put the fabric and the interfacing in the middle. I had been given this tip for working with things like Wonder Under, etc and thought I would use it with the interfacing as well.
I am enjoying reading the comments of the others in the group and your updates and instructions – very easy to follow.
Sandy
Hi Sandy, thanks for your comment, it’s really great to see so much interaction here I love it. For the first block of the month through Pastimes Online, I would say with this feedback it’s definitely a success!!
I like the idea of parchment paper (it also makes me look like a FAB baker..) I may use that in the future as to not gum up my iron and my ironing board!
Valerie